Tuesday, June 28, 2011

Canada Day!

July 1st is Canada day, so in light of the occasion (albeit a few days early), I decided to come up with a Canadian design. I wouldn't have time on the 1st because we have a family tradition of going Hiking in the Rockies to celebrate. Last year, I came up with a red and white water marble design, but that didn't do down as smoothly because it turned into a pink candy-like swirl on my nail. I came up with several different designs for this year, and not all of them contained the traditional flag. Some of them had the leaf in it's natural autumn colours, while some designs didn't contain a maple leaf at all. Then there was a cute design of a beaver. I knew most people would paint a large flag over their entire nail, but I wanted to do something different, as usual. However, I decided on simplicity and to do the flag anyway, but not over my whole nail. Instead, I created the flag on just my tips.

I practiced drawing the leaf on paper many times before the final design, and I have to say, I can actually draw it better now I've finished this design. Oh well, they look close enough. Like the soccer ball design, I really suggest you practice drawing a maple leaf first before attempting to draw one on your nails. You could use a pre-made decal, but being a free-hand artist, I wasn't going to do that after my newspaper design. After applying a base coat, I painted my tips white using Sally Hansen's "Lavender Cloud" with a straight, square shape, the same as the "black with white stripes or white with black stripes" design. Once the white dried, I painted the edges red with MigiNailArt's "Fire Red". Finally, I took the red, and using the pen I created the maple leaf. Before putting a top coat on, make sure your design is completely dry first! Any smudging and it will not look nearly as good. You also can't skip the top coat, because it protects your art. Once dry, I applied my top coat heavily on the tip with dabbing motions, then once that was dry, I brushed on smooth strokes over my whole nail.
As a little extra something, I decided to take a picture of my MigiNailArt collection. I kinda missed fitting them all in the frame, but you get the idea. I have something like 26 (x2) doubles... so 52 colours. I don't know the names of them all... I wish I did. MigiNailArt pens aren't my favourite, but I do like using them. True, you can achieve a lot using a dotting tool and striper brush, but sometimes the pens are useful, and I collect them more for the colours, rather than the pens. They do cost quite a bit, but if you know where to do, there are discounts you can get.

Stay safe, and happy Canada day for July 1st!

Wednesday, June 22, 2011

Newspaper

Removing that football (soccer) design was hard, but it's like a final goodbye. To be honest, I'm not a fan of this design as I thought I would be, so I'll probably come up with another one soon. That, and Canada day is coming up and I've started planning out samples for that. I saw this design on google and thought I would try it so if you're a nail art fan, you've probably seen it before.
I still haven't managed to get my hands on a card reader for my camera so I'm still using my webcam to take these rather sucky pictures. Sorry! But you can sort of see that I have a newspaper print on my nails. This was my very first attempt. My mother couldn't understand why I was cutting out pieces of newspaper today, because I never tell her what my design ideas are until after I've painted them onto my nails as a little surprise. I am a free-hand artist, but I thought I'd give this a try.
After a base cot, I applied a grey polish. I don't actually own a grey, and all of my silvers were too metallic, so I mixed my own up using Sally Hansen's "Lavender Cloud" and China Glaze's "Liquid Leather". About 1 part black and 4 or 5 parts white. Perhaps it was because my lamp was close to the polish but I found it dried ver easily, so as to not waste polish I only applied one coat. Once you've applied the grey, make sure it's completely dry. I sat and watched a movie while letting mine dry fully, so I don't just mean 5 minutes. Cut out some scraps of newspaper, the smaller the print, the better, and pour a tiny bit of rubbing alcohol into a dish. Dip the newspaper scrap into the alcohol and press onto your nail. Hold for a few seconds then carefully peal it off. The text transfers to your nail, but the writing is mirrored. This may not work for magazines. You can't use the same section of print twice so cut out a collection. This dries in seconds, so once you've transferred the text to all of your nails, apply a good top coat. Easy!
I hope you like this design better than I do. I'm sorry about the absolutely terrible camera quality! Hopefully I can take better pictures for you.

Wednesday, June 15, 2011

For Duncan - Football

A close friend of mine, Duncan, died on the 28th of May, age 20. I will forever miss him. He was a fantastic friend, always laughing and energetic. I met him when I was about 7 or 8 years old. He lived in the house opposite mine when I was still in England, and even after I left we kept in contact. We used to watch movies, play video games, and discuss his miniature model cars in his room, or climb trees in my yard or hang out on the trampoline at Lissy's. We have several mutual friends, and his Birthday was the day before mine. He told jokes and made up comedic songs (Mostly about my brother. We were kids). But my biggest memory of him was playing football (soccer) between our houses. Two of the trees in my yard were one set of goal posts, and the slope on his yard was the other goal. We would play up and down the street almost every day after school. He loved sports, and I believe football was his personal favourite. He taught me how to head the ball through the goal, and although I still can't kick it to save my life, I do remember that particular trick. Duncan will be missed and forever in my memories. Last Sunday, I lit a candle for him in church. I prayed for his eternal peace, as well as the comfort of his family and friends. This is for you. Love you, pal!
This design is tricky, and I made every effort to make it as close to perfect as I could. He's worth it! If you have troubles with this design, do as I did and practice on paper first. This is the website I used as a reference on how to draw a soccer ball. I practiced on paper first with a pen and pencil, and then with my polish. Once I had enough practice, I moved onto my nails. After I base boat, I painted my nails white with Sally Hansen's "Lavender Cloud". Once that was dry, I drew the soccer ball design with black. I used ArtDeco's black and MigiNailArt's black. Finally, I covered it with a top coat. Wait until the design is fully dry before applying a top coat, or the white and black will mix to form a grey. 
On my ring finger nail on my left hand, I have Duncan's initials "DR" in the centre. For this I used MigiNailArt's white. I was going to add his middle initial, M, but I decided to keep it formal and stick with the 2 initials. I also had a plan to include the English flag, but I decided against that also. I hope you like this design. It will stay on my nails for as long as I can stand it, so I apologize if my next blog post is later than usual. I might not be able to bring myself to remove this design by hand. Stay safe! RIP Duncan

Friday, June 10, 2011

Pentecost Flames

"Sunday, Sunday! Be there, be there!" Okay, it's not a monster truck rally, but this Sunday is pentecost, which means that the theme can be nothing other than fire. if you're not a Christian, you can very well ignore this and just have a fire theme for fun (why not?). I had the idea of playing Dragon Force "Through The Fire and Flames" over the sound system at the end of the service, but I decided against it. Not that it really makes a difference, but I doubt my priest would talk to me again. So, just the nails it is. If I still had my beloved acoustic drums at church, I would be more than excited to cover the front of the base with flames, perhaps attaching appropriately coloured tissue paper to my cymbals, but that's not easy to do with a tiny plastic kit that no one can see. Maybe I'll just clip bits of tissue paper to my hair and pretend it's a completely normal thing to do. I love being an individualist!
So, back to the subject of nails, which is they you're here, it's time for fire! I did have a few designs where I would draw flames on either the base or the tip on my nail with a clear or black background. I achieved this by using a striper brush, but when people think of fire, the common thing to think of are flames. Why be normal when you can be creative? So sorry if I tricked you with the above picture, but this is not the design I have on today. My thumbnail is a lot longer than that now. Although I am wearing those same jeans. I've started changing the shape of my thumbnails to match the others by making them more square and less rounded, with ultimately makes them stronger, because there is more surface area at the tip of the nail when they are square. To change the shape, this does take several weeks so I can allow my nails to grow as I file them between designs. Getting a manicure is great, but it is only really effective if you continue to have one once every week or two. I suggest if you are a nail biter trying to quit, get a manicure done at least twice a week.

Behold, fire nails! If you're interested in doing what I did and only painting the tips of your nails, I'm afraid this design doesn't work for short nails. If you do have shorter nails but would like to try this design, there is nothing stopping you from filling your entire nail with these colours. After a base coat, take a nice yellow (I used MigiNailArt's "Lemon") and paint a small amount on a clean foundation sponge. Once you do that, quickly dab it onto the whole tip of your nail before it dries, starting at the very tip and moving down the nail to create a gradient. This works better if you paint a pale pink coat over your entire nail first (I suggest Sally Hansen's "Nearly Nude 2"), but you don't have to. I didn't. Once you have the yellow on your tips, do the same thing with orange, I used MigiNailArt's "Neon Orange". Don't place the orange over your entire tip like you did with the yellow. Instead, dab it on about 2/3 of your tip, leaving some yellow by the base of your tip. Don't forget to start at the tip and work down. After the orange, do the same with a red. I used MigiNailArt's "Fire Red" (how appropriate for this design).. This time, only dab it on 1/3 of your tip. This method dries the polish very quickly, but double check to make sure your nails are completely dry in between applying these colours. You can either leave your nails with these 3 colours, or you can continue with my idea. I took OPI Nicole's Black Crackle polish and hand painted it on the very tip on my nail, as well as the free edge. The crackle effect makes the tips look charred and burnt, just like the coals of a fire. Finish off by covering your dry design with a top coat, including the free edge. If you're really adventurous, instead of painting your nails with a clear pink or leaving them clear before applying the yellow, take a light grey and your clean foundation sponge and apply that over the whole nail. When you have completed your design, they grey will look like smoke.

I hope you enjoy this design, whether it's looking at my pictures or trying it on yourself. I'd love to see what fire/pentecost designs you can come up with!

Sunday, June 5, 2011

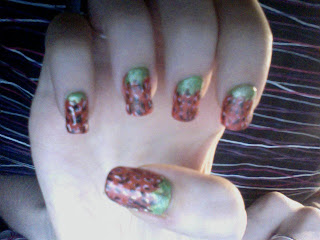
Strawberries!

Fun party today! It was a strawberry theme, where most foods served contained strawberries or where strawberry themed including the decorations. When there is a theme to a party, how can you NOT add it to your nails? If I could turn a fondant sponge cake into a giant strawberry, I could find a nail design. I was a little silly and didn't look up a picture of a strawberry before hand, so feel free to paint the seeds yellow like they should be. I went for the black and white look and people still recognized them as strawberries.
After a base coat and before a top coat, I painted my nails red with two coats of Migi Nail Art's "Fire Red". Then I dotted them with DecoNail's white, and I placed DecoNail's black over the top, not being too careful the line the two so the white still showed through. Once that had dried, I took MigiNailArt's green and created the spiked leaves over where my lunular should be (by the cuticle. This could also work at the tips). I then painted over the green with MigiNailArt's metallic green. If I was to redo this design, I'd make the seeds yellow instead.

Personally, I think this is one of my worse designs that I have done recently, maybe because I painted them in the dark, or maybe because it was late at night and I was tired. If you try this design, i hope you have better luck!