Friday, August 26, 2011

Fireworks

So this design started with just the base colour, but I rarely wear a single base colour by itself, so I added the silver firework design. When I'm out of my house, I am representing my own business by what I wear on my nails, as well as the manicures I give to other people. But this design is so simple, I'm sure almost anyone can mimic it. It's easy to give yourself a foot massage without training, but it feels so much better when someone else gives you the massage. I feel a manicure is similar. You can copy this design with your own colours, but I can still paint simple designs on my clients, not because they don't know how, but because the feeling of someone else with training doing your nails feels so good. If someone else offered me a manicure, I'd take the chance in a heartbeat! I love being pampered just as much as the next girl.
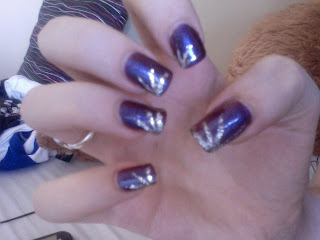
Sorry about the camera quality. My dad has the digital camera at the moment. Anyways, I love the base colour and have wanted to wear it for such a long time, but I have never had the opportunity to include it in some of my other designs. After sitting in my collection for so long, I thought it was time to let it shine! This is Sally Hansen's "Ruby Sapphire" from her Nail Prism collection. I had to apply at least 3 coats to get the opaque look. The silver is Art Deco's "Silver". It's very glittery, so it will be a beast to remove when the time comes. I used even strokes with the striper brush from the corner of my nail towards the centre 3 or 4 times to create a star or firework effect. Because this colour is dark, I made sure I had a good base coat on my nails to start with, and finished off with a top coat to really let the shimmers and sparkles come alive, and get the full effect of the prism colours. Ruby Sapphire is  a purple and orange/red. It looks more purple than red on the nails, whereas in the bottle it's about even. I don't mind too much though because purple is my favourite colour.
This is how my not-so-gimpy nail is getting on. It's getting longer nicely, but it will take a few months of growing and filing to reach my desired shape. My thumb nail is still hanging in there, and the bonding that I'm using that I mentioned in my previous post is working very nicely. If I get nail glue soon, I'll substitute the liquid bandage with the glue.

I didn't take pictures of my toenails because I'm not too keen on feet (although I do offer pedicures) and recently suffered some trauma to a few of my toes by walking into a door (yeah), but today I painted them with Sally Hansen's "Uptempo Plum" from her Insta-Dry collection (it's a VERY dark purple, almost black, and in some lights the purple looks almost gold), and placed OPI Nicole's "Silver Texture" crackle polish on top. I think it looks pretty nifty. Perhaps it's ano optical illusion or something, but I think the dark appearance of this combination makes my nails look a lot smaller. I rarely go without covering my feet in public (I'm a Converse fan), but I still painted them just to see what the polish combination would be like, and I do like it. It's not my favourite, but I still like it.

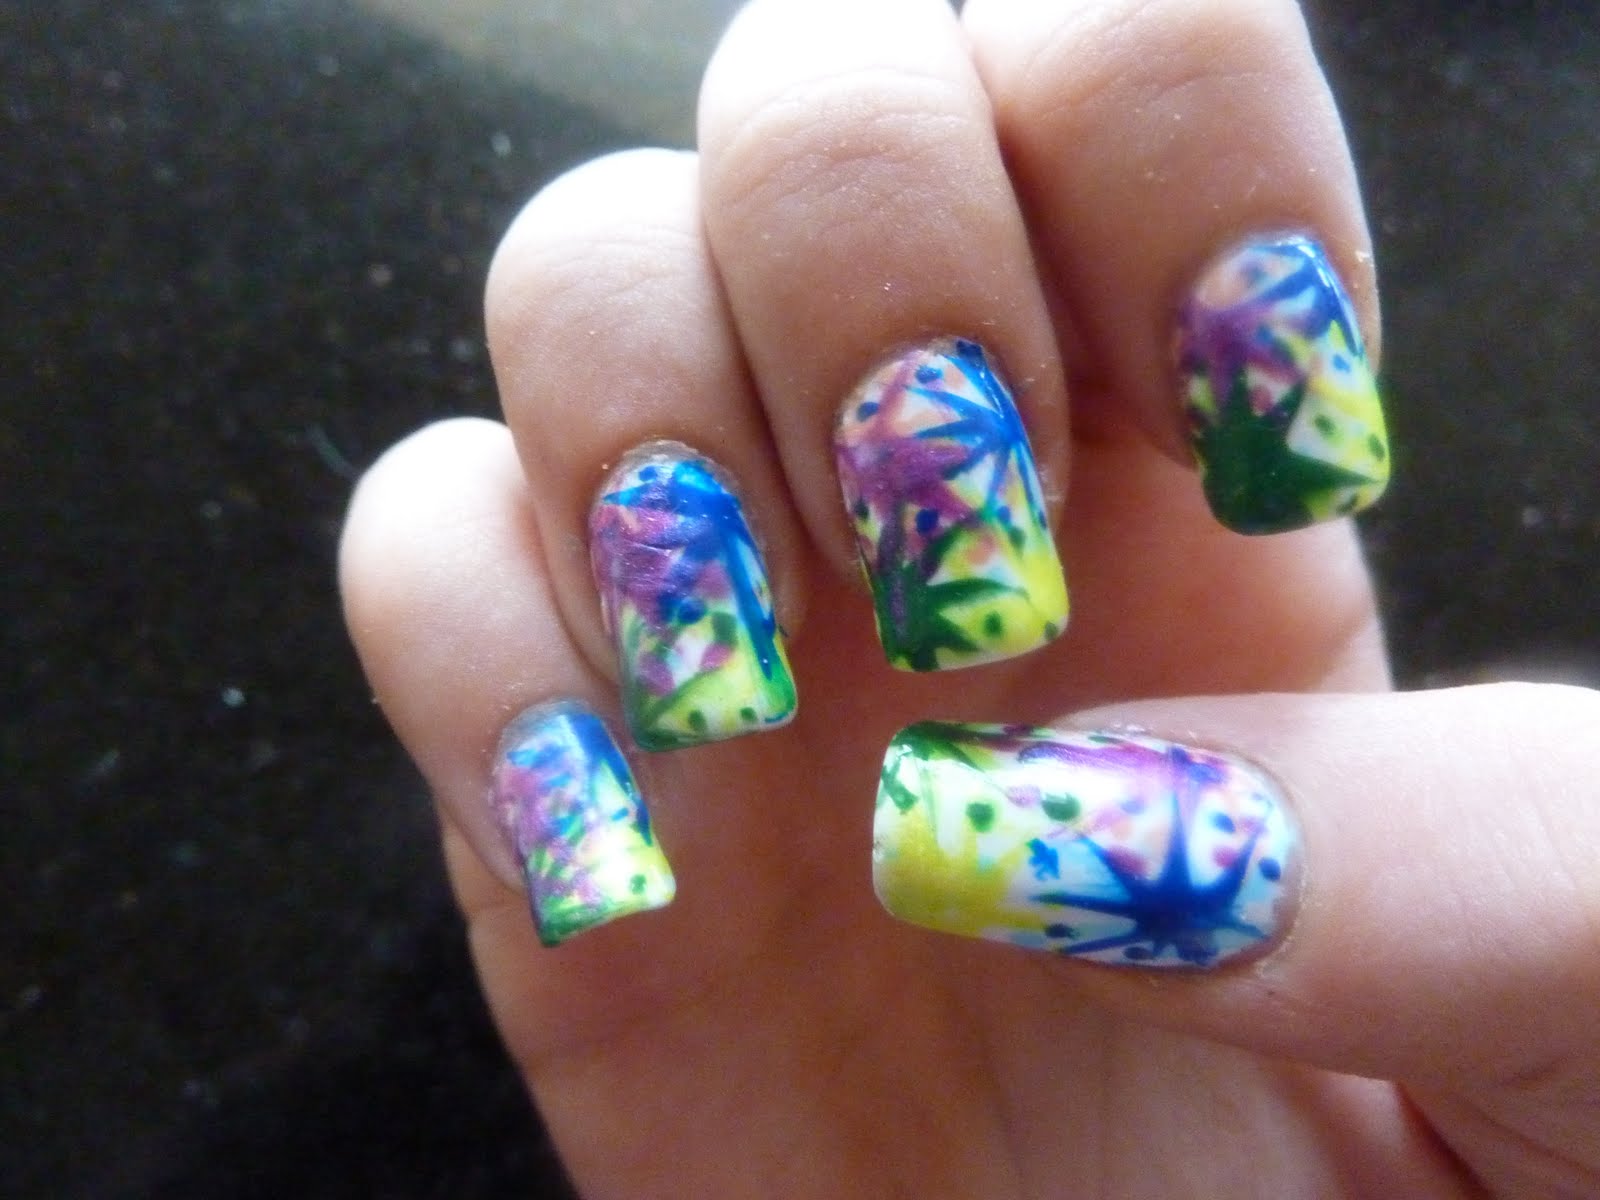
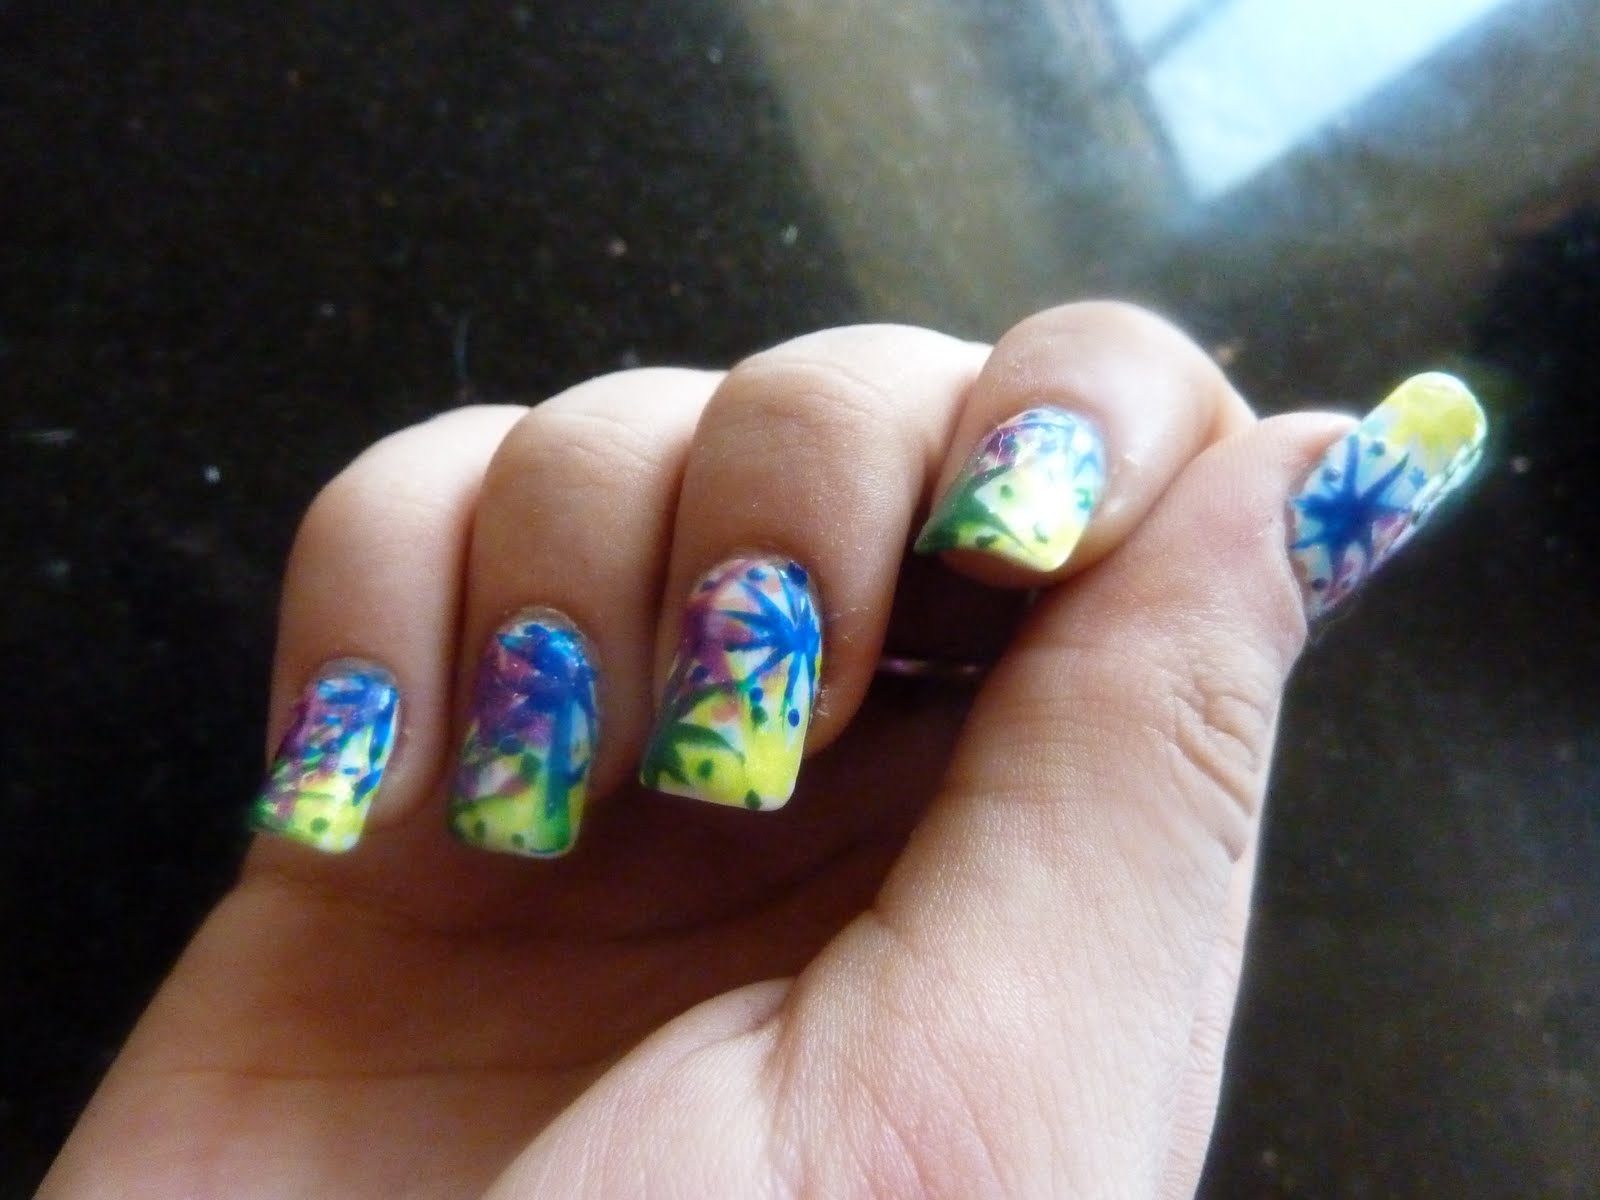
If you try it on yourself, or my Fireworks design, i hope you like them too ^.^

Wednesday, August 24, 2011

Ripped nail number 2

Yes, bad news, guys. Just like my left index finger, my left thumb has split right at the base of my tip. I'm changing my nail design either tomorrow or Friday, so I'll make sure to show you the nail growth progress of my index finger then. It has grown very well, and although still the shortest, it doesn't look so strange anymore. I recently did plain silver gradient tips on myself, but I didn't post about them because they weren't the most interesting of the gradients.
My thumbnail ripped yesterday and I didn't have any nail forms (or "nail band-aids") so I took New Skin liquid bandage and placed a couple of drops of that onto the tear to seal it, then applied a coat of Sally Hansen's "Insta-Fix". It's a thick clear coat that I thought might help. This morning I took the silver polish off my thumb, filed my nail down,  and applied my routine care tips with a few extras. My nail was too long anyway, but you know I long length so I didn't file it to the rip. I applied a thin coat of Sally Hansen's "Insta-Brite", then once that dried I painted the New Skin onto the crack, making it quite thick, but also smoothing it out onto the rest of my nail. I let that dry (it took a while), then applied 2 thick coats of Sally Hansen's "Miracle Nail Thickener" and 2 thick coats of Sally Hansen's "Diamond Strength". Once they dried, I finished it off with Sally Hansen's "Insta-Dry" top coat.
Hopefully my nail survives this, it's only been one day so far, but if my plan works, I'll keep my thumb nails shorter than usual and let the rip grow out. To be completely honest, I'm doubtful, but I'll give it a shot. I need to take extra care of that nail now and really watch what I'm doing with that thumb. I'm pretty sure the rip came about because of my trying to pry the scissors open on my new pen-knife.

Friday, August 19, 2011

Burberry

It is so very frustrating when every single one of your black polishes either runs out or goes gunky (and I don't own a polish thinning solution). I created a Burberry design a year or two ago on a sample nail, and I tried to recreate it on my own nails last night, but my black polish simply would not behave. I only did one hand before deciding to give up and go to bed, so I'll probably take it all off and choose another design for this week. Something simple. Here is what the original looks like:
This picture is blurry because I had to blow it up, but you can still see the design. I thought that looked nice and neat, but that was when my black polish was brand new and behaving. My parents don't think the new version of the design is that bad, but I am my own worst critic. As I didn't fully care about this design by the end of it, I allowed it to dent and smudge so now it is a real mess and I'm only too glad to remove it.
To create this design correctly, I first painted my nails with OPI's "Queen of d'Nile". I used 2 coats because it's quite thin. Once that dried, I drew three horizontal black lines at the tip, and 1-3 at the cuticle. The black I used was a combination of MigiNailArt's black, China Glaze's "Liquid Leather", and Art Deco's "Black". Then I filled in between them with white. I used Art Deco's "White". With the black again, I drew 1-3 lines down either side. Try to make this design slightly off-centre to make it look interesting. Finally, I took Rio's "Red" and painted a cross through the blank space. Don't forget a base and top coat!!
I'd like this design if it had actually worked and the lines were neater. To me, it looks like a 5-year-old attack my nails, but as I said before, I'm my own worst critic. If you try this design, I wish you luck and I hope it turns out better than mine.

Monday, August 15, 2011

Art Attack

As promised, here is today's second design! I'm not sure if I'm allowed to use the title "Art Attack", but I'm going to try. One of my favourite TV shows when I was a little girl in England was Art Attack, where you learned how to do arts and crafts using every day items you can find around your house. The title sequence at the start of every episode had a white background, and as the names of the people involved in the show were shown, various colours of paint was squirted onto the background. I haven't seen this show for a very long time, and every time I've come across it in Canada, it's in French. Anyway, I created this design, and Art Attack was the first thing I was reminded of, so that's the title of this design. It also does look like attack of colours in an artistic way, so hopefully I can get away with this title.
This was my first attempt at the design, so I'm going to have "failed fingers" and my favourites. The design on my thumb is my favourite. So, for this design, after a base coat, paint your nails white. I used Sally Hansen's "Lavender Cloud". Then, take a yellow (I used MigiNailArt's "Lemon yellow") and draw the basic shape of a paint splatter or star in the corner of your nail. You don't have to bee too neat, because paint splatters aren't neat. After the splatter, place random dots around it. Now with a green (I used Rio's Green), create another splatter in another corner, followed by more random dots. In the third corner, create another splatter/dot design with a blue. I used Rio's Blue. And in the final corner, another platter with more dots using a pink. I used Rio's... well I can't find a name on it, but it's a shimmery pink/purple. Once the design is dry, cover it with a top coat. Easy!
If you look carefully, you can see other shades of the same colours underneath my final design. I started with those colours and found the design looked too light. If you want to use lighter designs or really copy my design and place lighter colours under the bolder ones, I shall tell you what I used. I liked the neon yellow, so I kept that, but underneath the green, I used MigiNailArt's "Kelly Green". Beneath the blue, I used MigiNailArt's sky blue, and beneath the purple I used MigiNailArt's peach.
This is my third and final entry to the nail art contest I'm participating in. Check out the video below. In the video, you will be able to see the design with the original colours. It's up to you which set you prefer. I hope you like this design!

Pacman!

I am so sorry this design is late! I finished it days ago, but I left for the weekend and took the wrong camera cord with me. To make it up to you, I'll post twice today with two new designs. This first one is a Pacman design. I had this on my nails way back when, when I was still biting them, and I decided to bring this design back as my second entry to a nail art contest I'm a part of. To view the tutorial entry video, scroll down to the bottom of this post.

So I've changed a few things about the design, as you can see. When I first had this design painted on one hand, I had Space Invaders on the other. For this post, I'll just be explaining the Pacman design. To start, paint your nails black. Makesure you are wearing a base coat if you paint your nails black! That's very important. Using dark colours without a base coat can dye your natural nails, and the design won't last as long. I used China Glaze's "Liquid Leather". Next start on your index finger and paint Pacman's shape. If you want, you can paint a yellow circle, then use a black to cut out the mouth. The yellow I used was MigiNailArt's "Lemon Yellow". Place tiny white dots before and after Pacman. My white was from MigiNailArt. Moving onto your middle finger, paint a line of white dots, making one of them larger than the rest. On your ring finger, draw a line of zigzags with a sky blue (mine is from MigiNailArt) at the tip, then draw an arch stretching towards your cuticle. Fill this shape in. With a white, draw two tiny ovals for eyes, then add black pupils. The black I used for the eyes is by ArtDeco. Add white dots on either side of the enemy. On your pinkie, create the same enemy, but paint him pink. I used a pink by MigiNailArt. Again, add white dots on either side. On your thumb, hold it sideways and draw a blue line at the 'top' of your nail, and another one running parallel. Make the two lines very close. I used MigiNailArt's "Royal Blue" from their neon collection. These are the walls of the maze. Under those lines, paint an orange or red enemy. I used MigiNailArt's "Neon Orange". All of my little enemies have their eyes facing different directions. Add white dots on either side. With the same blue you used for the lines, paint a single line at the very tip of all your other nails. Wait for your deign to dry, then cover with a top coat.
I hope you like this design! I've had a few comments of its humour. Check out the video I made for this design as part of the contest:

Thursday, August 4, 2011

Summer Flowers

Looks like a complicated design? well it is. Not very difficult, but definitely complicated. This design came about because of a nail art contest posted by "ilovemylongnails", and I thought.. why not? It's a fun opportunity, and even if I don't win, I get a new nail design out of it. So this is the design:
Let's see if I can explain how to do this design for those who can't view the video at the end...
Okay, after a base coat, paint the tips of your nails blue with a french smile line. I used MigiNailArt's blue. Once that's dry, paint over it with a purple. I used Sally Hansen's "Ruby Sapphire". Let that dry, then paint your whole nail with a glitter polish. I used Sally Hansen's "Shooting Star". Now to get to the flowers! Place a glob of yellow onto a piece of scrap paper (mine is by MigiNailArt), then take a tiny art brush and paint petals in a top and bottom corner of your nail, or the side, or one corner, or wherever you want. With a cream colour (mine is by MigiNailArt... again), paint the base of the petals, then with an orange (I used Nubar's "Neon Pumpkin"), paint over the cream. Then get a green (mine is, shocker, MigiNailArt), and create leaves coming out of the petals. With a brown, fill the corners or sides at the base of the petals. The brown I used was OPI's "Queen of d'Nile". With a pointed tip (brush, toothpick, etc), paint black dots over the brown. I used China Glaze's "Liquid Leather", then add yellow dots there as well. For the final colour, place a glob of white on scrap paper, and with a striper brush, place stripes on the nail, then take a dotting tool and place varied sizes of white dots alongside the stripes. The white I used was Sally Hansen's "Lavender Cloud". Wait for your nails to dry before painting a top coat on, then clean around your cuticles, add nail oil, and you're done!
I hope you like this design! Here is the contest video:

Also, this is how my short nail is growing out. It's getting there... slowly.