Hey guys!!
That's right, it's time for a new post! I really love this design and couldn't wait to share it with you all! Just head over to scribblingwithpolish.com and view it on my blog section.
Or, click the link below.
http://scribblingwithpolish.com/2/post/2012/09/mooooooooo.html
This design has been given the simple title of "Mooooooooo!" Can you guess the theme?

This is my collection of nail art designs, as well as a few of my tools, polishes, and gels.
Wednesday, September 12, 2012
Sunday, July 22, 2012
SURPRISE!
I HAVE A WEBSITE!
That's right, the surprise that I've been pain-stakingly working on since October has been my very own website. I've transferred this entire blog over there, as well as created a gallery, a polish collection, and a contact page. All new designs will be posted over there, but I will keep this Blogger account open. If you wish to know when I have posted a new design, I'll let everyone know on Facebook (link below), and I'll write a new post here letting you know to check out any new designs, but if you want to see them, you'll have to go over to my new website. And here is the link:
SCRIBBLINGWITHPOLISH.COM
On the left hand side you'll see a menu. Here you can few my home page, blog, gallery, polish collection, and contact page.
My blog will be very similar to this one. All posts will be archived and organized by date, as well as by category. My categories are:
My gallery will contain select pictures of every nail design I have ever posted (and more!). Each picture will expand when clicked, and has it's own design name.
My polish collection will contain pictures of all of my polishes (coloured and clear) as well as some of my equipment and tools. My polish collection spreadsheet can also be found on that page once I've updated it.
My contact page is where you can drop me a little (or long) note that only I will see, and will also contain a link to my Facebook page. You are also free to comment on any of my blog posts, and those comments can be viewed by all.
I will still be accepting e-mails to either scribblingwithpolish@gmail.com or emily@scribblingwithpolish.com and please 'like' me on facebook at facebook.com/scribblingwithpolish to receive updates, pictures, notices, and short posts that may or may not be included in my blog.
For months now I have had an extending collection of back-logged designs which I have now added to May, June, and July 2012 on my blog which have never been seen before. Some are pretty awesome designs, some are a few mistakes of mine, and one is a special effects design that shouldn't be viewed by those who can't handle the sight of (fake) blood. I hope you enjoy them! You may still comment on any older posts here (or this one) and I'll still reply, but any new posts will be on my new website.
Friday, July 20, 2012
Sneak Peek
Hey guys,
I'm super sorry I haven't posted since MAY!! But I'm working on something super awesome for you all and I'm really excited to show you, but I can't until it's finished, and it's taking me longer than I expected to get it done, but bare with me, it will be finished.
I have still been painting my nails and taking pictures, although I seem to have misplaced my camera somewhere. Anyway, The designs that I photographed but haven't blogged, you WILL see once the thing I'm working on is done. I realized that I sort of dropped off the face of the Earth without noticed, so I'm letting you all know that I'm still here and still taking e-mails, questions, comments, and requests, and as a little cookie for you all, here is another design to stem your patience.
Does it have a name? Nope. If you have any ideas, I'd appreciate a comment ^.^ Get your creative juices flowing.
 I borrowed someone else's camera for this one and I'm not used to using hers so forgive any colour or focus issues. These nails are a LOT more neon off-camera, and it surprises me whenever I see them out of the corner of my eye. They are amazing against a black background, but I didn't have anything black to hold my hand against at the time, so I opted for white instead.
 After applying a base coat, I painted my nails white with Quo by Orly's "French White". Then once that completely dried, I painted three MigiNailArt colours from their Neon collection starting with "Lemon" near my cuticles, heavily at the base, and fading out towards the tips of my nails. Next I used "Neon Orange", making it heavy in the middle and fading into the yellow and towards my tips. Finally, I applied "Hot Pink" on my tips and faded it into the orange.
I let these colours dry slightly and become tacky, then I took a clear polish and smudged all the colours together. If you try this, make sure you use strokes only form base to tip, not side to side, and unless you want to waste a clear polish by cleaning the brush every time, make sure it's a polish that you don't really care about.
Once the neon colours and clear coat were completely dry, I took Sally Hansen's "Black Out" and a striper brush and painted horizontal stripes on my nails, started thicker at the edges and tapering off at the ends. I alternated between starting on the right and left sides of my nails so it created a zig-zag or zipper pattern. Not quite a true zebra print, but more of an abstract version. Let the black dry fully (it smudges easily with the application of a top coat so really be patient here) then apply a top coat and clean around your cuticles.
 Sorry about the poor picture quality. Hopefully I'll find my own camera soon, and finish this project that I'm working on. It's tedious work, but I know it will be worth it!
I'm super sorry I haven't posted since MAY!! But I'm working on something super awesome for you all and I'm really excited to show you, but I can't until it's finished, and it's taking me longer than I expected to get it done, but bare with me, it will be finished.
I have still been painting my nails and taking pictures, although I seem to have misplaced my camera somewhere. Anyway, The designs that I photographed but haven't blogged, you WILL see once the thing I'm working on is done. I realized that I sort of dropped off the face of the Earth without noticed, so I'm letting you all know that I'm still here and still taking e-mails, questions, comments, and requests, and as a little cookie for you all, here is another design to stem your patience.
Does it have a name? Nope. If you have any ideas, I'd appreciate a comment ^.^ Get your creative juices flowing.


I let these colours dry slightly and become tacky, then I took a clear polish and smudged all the colours together. If you try this, make sure you use strokes only form base to tip, not side to side, and unless you want to waste a clear polish by cleaning the brush every time, make sure it's a polish that you don't really care about.
Once the neon colours and clear coat were completely dry, I took Sally Hansen's "Black Out" and a striper brush and painted horizontal stripes on my nails, started thicker at the edges and tapering off at the ends. I alternated between starting on the right and left sides of my nails so it created a zig-zag or zipper pattern. Not quite a true zebra print, but more of an abstract version. Let the black dry fully (it smudges easily with the application of a top coat so really be patient here) then apply a top coat and clean around your cuticles.

Tuesday, May 1, 2012
Pastel Neon Leopard
I LOVE THESE NAILS!
I'm not sure if you'd classify these as neon or pastel (seems like an oxymoron), but they are colourful all the same.


 Eeep! So, I won't go into the names of the colours I used because I can't remember and there are so many, but they were all from either MigiNailArt or Nail Jazz.
I started with a base coat or 4 ;) then on some nails I applied a purple and sky blue on two halves of my nail. Once the polish became tacky, I took a top coat that I didn't mind getting contaminated with colour and I applied it on top to smudge the two colours together. I did the same thing on my other nails, but with sky blue, creamy yellow, baby pink, and pastel green.
Once that completely dried, I took a black and painted 'c's, 'u's, and 'o's on my nail. I tried to make them look like leopard prints but those 3 shapes are basically what you draw. Look at a picture of a leopard to get more of an idea. On the blue/purple nails, I added hot pink to the centre of some of the spots.
I let the spots completely dry so they didn't smudge, and then applied a coat of Sally hansen "Diamonds" to give it a little glitter. Finally I covered the design with a top coat and cleaned my cuticles.
I'm not sure if you'd classify these as neon or pastel (seems like an oxymoron), but they are colourful all the same.


I started with a base coat or 4 ;) then on some nails I applied a purple and sky blue on two halves of my nail. Once the polish became tacky, I took a top coat that I didn't mind getting contaminated with colour and I applied it on top to smudge the two colours together. I did the same thing on my other nails, but with sky blue, creamy yellow, baby pink, and pastel green.
Once that completely dried, I took a black and painted 'c's, 'u's, and 'o's on my nail. I tried to make them look like leopard prints but those 3 shapes are basically what you draw. Look at a picture of a leopard to get more of an idea. On the blue/purple nails, I added hot pink to the centre of some of the spots.
I let the spots completely dry so they didn't smudge, and then applied a coat of Sally hansen "Diamonds" to give it a little glitter. Finally I covered the design with a top coat and cleaned my cuticles.
The Northern Lights Of Essie Fire!
Does that blog title make absolutely no sense? Yeah, I thought so. I've been painting my nails more than I've been blogging, so I have a few back-logged designs, and these three aren't all of them.
The first one is The Northern Lights.


To be honest, I'm not a huge fan, but I should show you guys my fail nails, too. The second picture is "Sapphire" (I think) by Quo/Orly which is my base colour. The other blue/purples that I added are all crackles. They didn't really crack much. Oh well. Also, it doesn't look like the Northern lights. I can see the real-deal from my bedroom window on clear nights and they don't look like that. Oh well. The design is still... interesting?
This next design is just showing off my new Essie top coat, "Shine of the Times" with a purple base.

 it's a multi-dimensional glitter coat. In different lights and different angles, it changes colour, from red to blue to green to gold. You can see a video of these nails below. Excuse the background music, my mother or brother was practicing piano at the time.
Now for the third design, it's FIRE!
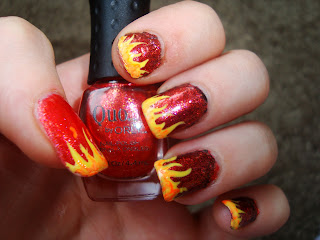
 I've heard this works as a Hunger Games design, but I'm not a fan so I wouldn't know. I only saw the movie once, not knowing what I was about to see. Meh, I thought it was okay. Anyway... yes, my thumb looks different. It's the same polish, "Garnet" by Quo/Orly, but it doesn't have black as a base. Goes to show that putting a coloured base on first really changes how the polish turns out!
I have several more backed-up designs that I hope to show you one day. I have a not-very-good crackle one, a special effects design, and a Deathly Hallows one. Stay tuned and I'll post them at some point in the future.
The first one is The Northern Lights.


This next design is just showing off my new Essie top coat, "Shine of the Times" with a purple base.


I have several more backed-up designs that I hope to show you one day. I have a not-very-good crackle one, a special effects design, and a Deathly Hallows one. Stay tuned and I'll post them at some point in the future.
Easter then some guilt
I haven't blogged for so long! I'm so sorry! Guilt! Well, now I have brand new internet, I might be able to create more video tutorials because I can now use youtube at home ^.^
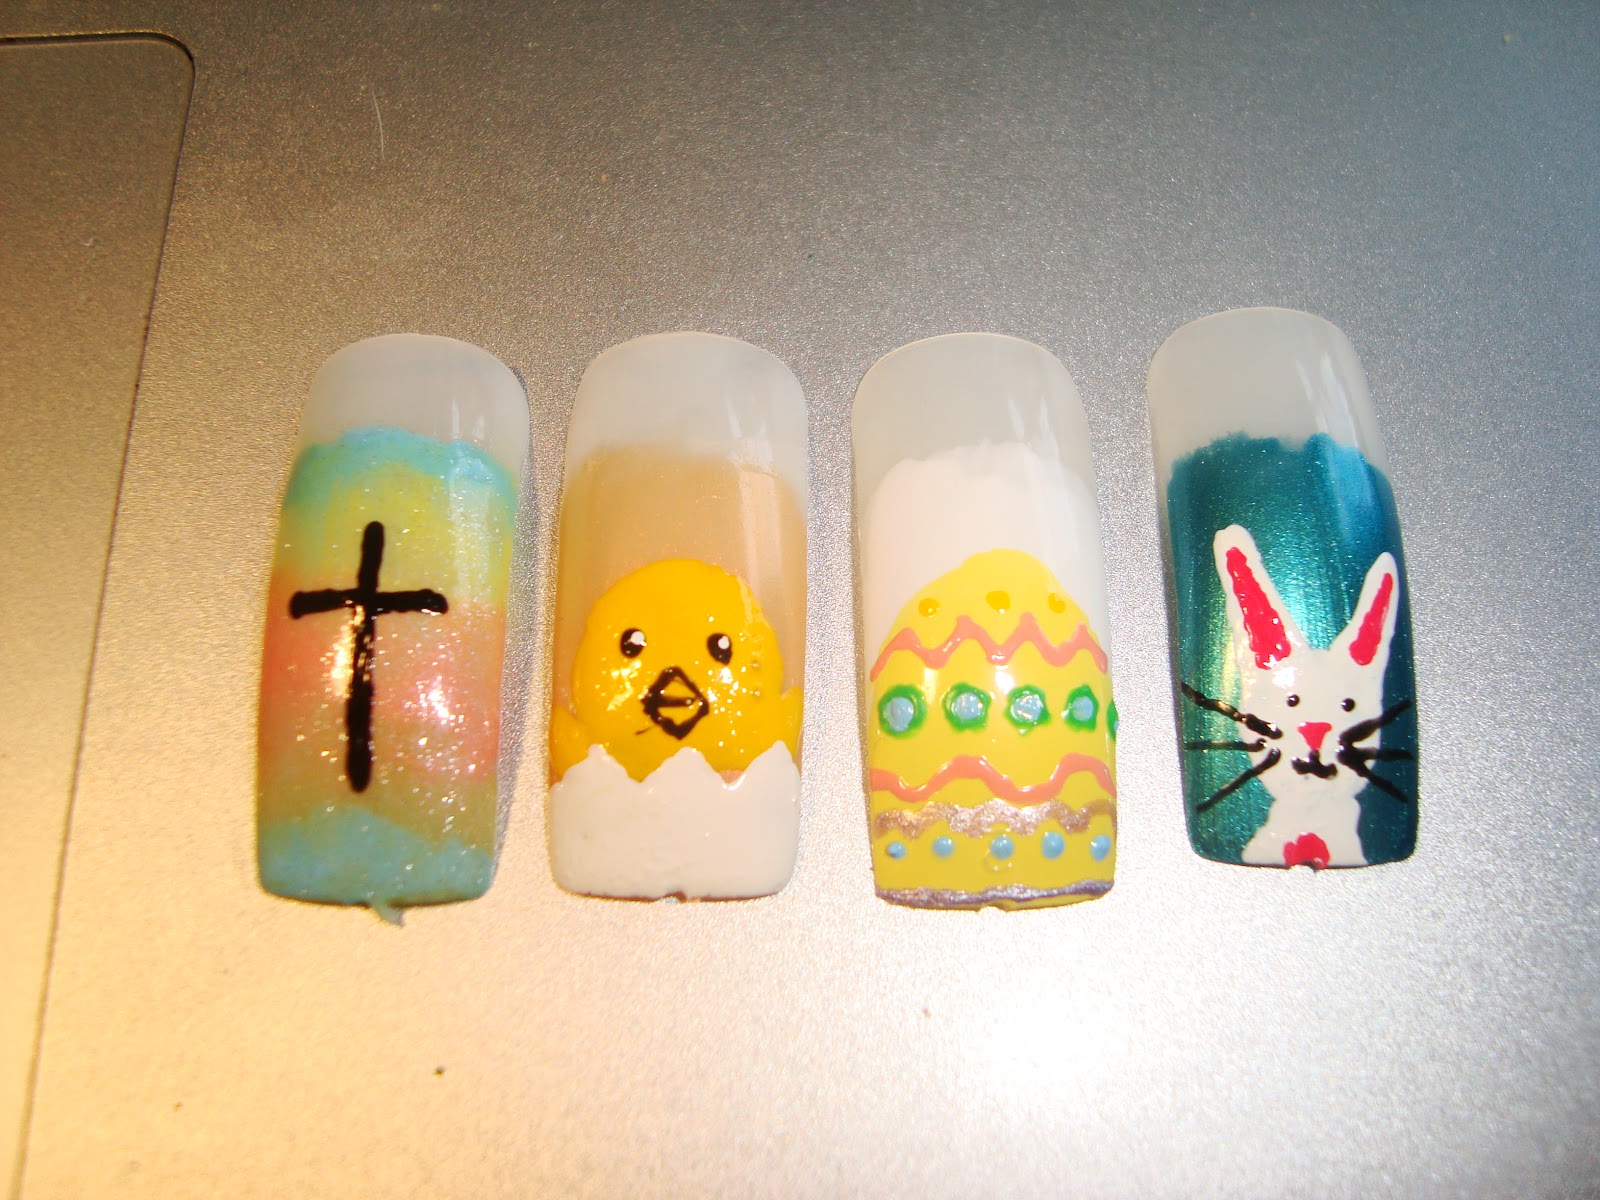
You wanted to know what the Easter nails looked like? Well it's a repeat from last year, but because I paint all of my designs free-hand, it's not identical. I also didn't paint the bunny, and instead promoted him to his own design.


 If you want to know how to paint this design yourself, check out last years blog post: Spring-A-Ling (link opens in new window). Hopefully I've improved it. For my other designs, I only painted them on sample nails and quite complicated so I won't include a tutorial, but if you really want to know how I did it, comment that you want a tutorial on one of these as a comment and I'll include it in a future blog post for you.

 Like I said, I gave the bunny his own nail design, and I'm pretty sure I've improved him. I miss the floppy ear, though. I would recommend a different background colour for the Easter chick, because you can barely see that he's raising his tiny wings. The Easter egg is completely customizable, and the pastel cross one is glittery.
You wanted to know what the Easter nails looked like? Well it's a repeat from last year, but because I paint all of my designs free-hand, it's not identical. I also didn't paint the bunny, and instead promoted him to his own design.


Wednesday, April 4, 2012
Palm Sunday
I know this is a little late but I wanted to blog this design before Easter came around. I have a couple of designs saved up for a rainy day but there are so many "special occasions" round about now (like Paddy's day, Easter, etc.) that I've had to backlog a few of them. I will be coming up with a couple more Easter designs on sample nails this year, but on my own nails I'm going to recreate one of the three designs from last year.
Anywho... Palm Sunday is a Special week in the Church calendar. It's where Jesus came back from his 40 days and nights in the desert and his disciples placed him on a donkey so he didn't have to walk (He was pretty tired) and as he arrived into the city to prepare for his crucifixion (which only he really knew about at the time) the citizens placed palm leaves on the ground for the donkey to walk on because its feet were hot on the sand. Also it was a sign of respect towards Jesus.
So that's a little background story. You don't have to use this design for Palm Sunday, you could simply using it as an interesting palm leaf design.

This design is different because of the polish I used. If you have this polish, awesome! If not, it's still a nice colour if you have something similar. After a base coat, I applied a couple of coats of Del Sol's "Electrick". It's a shimmery sky blue that in a UV light (or sunlight) it turns bright green. Once that colour dried, I drrew palm leaves on my nails using Nail Jazz "Green" which is actually a dark green. Once the leaves dried, I went over them with another green Nail Jazz colour. It has no name but it's a mossy shimmer/glitter green. Then when that dried over half of the leaves I added MigiNailArt's "Kelly Green", a neon green to complete the effect. Make sure you let this design completely dry before adding a top coat or the design will smudge. If you skip the top coat, your design with chip and look quite nasty.

You may notice from these pictures that my index finger has a chip in the corner and my middle finger has a cut. It was so windy here that many large objects blew down my field, including a shed. Just after I finished this manicure I had to throw a jacket and boots over my PJs and run after the objects. They were heavy and the wind was strong as I dragged them back up to the house that I did some damage to my nails/fingers. Kinda sucks because I hadn't taken pictures of this design yet. So for Easter (I think I'll change this design tomorrow... maybe?) I'll try to reshape the broken nail and hope the designs still work and look decent. I hope you have better luck if you complete this design!


Saturday, March 17, 2012
Luck o' the Limes!
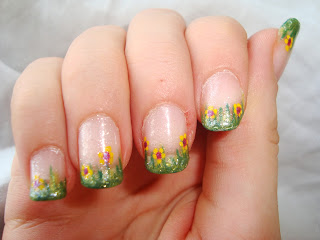
Happy St. Patrick's day, everyone! Am I Irish? Not a bit, but I can never pass off an excuse to do my nails to an occasion. If you like green, you've come to the right place! Unfortunately, it's my least favourite colour, but I quite like these nails. Why Luck o' the Limes? I'm English. I'm a Limey!
Anyway, I think this blog will be another picture spam. I did take quite a few with and without interesting effects. First, you might notice that my nails are considerably shorter. I took a pencil and marked the half-way point on my tips and filed down to the line. Here is a comparison photo that my brother kindly took:
 The nail glue makes my nails look kinda dirty, sorry. Also, you might be able to see that my right (left in this picture) thumbnail broke. The corner just came clean off, but once I filed it much shorter, it looks square again. So... to the green!

 So much green! It's a nice excuse to use some of these colours. When I don't particularly like a colour, I don't really include it in my designs. But since Claire bought me the green sparkles for Christmas, I've been dying to use that polish again! So for this design, make sure you have a good base coat like usual, and paint your nails completely white. I used Quo by Orly's "French White". You'll need this white to make the colours pop out more, and although it won't do much to the darker shades, you really need a white base for the lighter ones or they won't look too great.
 Dosn't have to be perfect, it just has to be white. So, onto the colours. You can do this step in a bunch of different ways from regular stripes to splattered effect to drag effect, to sponging, or you can follow along with what I did. If you notice, the gradient with this design is smoother than it normally is. Well this is how I did it.
 Nice and messy! I took 4 different shades of green and starting with the lightest, I splodged them onto my nails in stripes, slightly overlapping each other. the lightest green is Sally Hansen Ceramics "Ghoulish Green" which, to be honest, is a really nasty colour! It's a short of shimmery greeny yellow. Brilliant for Halloween. The next lightest is MigiNailArt's "Kelly Green". The second darkest shade is Princess Collection "Electric Green", and the darkest is Nail Jazz "Green". Here is something I've not said before... Don't let these dry completely! Shocker! Let them get slightly tacky, so by the time you've placed all of these colours on one hand you should be fine. Once they were tacky I took OPI's "Fresh Frog Of Bel Air" and applied it thickly over my nails. This is the glittery green. It's actually a clear coat with sparkles in it, so the clear polish smudges the other polishes, turning them into a gradient. If you try with with regular clear polish, it will still work, but you'll contaminate the clear with whatever colour your'e using. It contaminates this OPI polish, too, but because it already contains a lot of green, you don't really notice it as much. Finish off with a top coat, and you're done! Time for a photo spam!


Anyway, I think this blog will be another picture spam. I did take quite a few with and without interesting effects. First, you might notice that my nails are considerably shorter. I took a pencil and marked the half-way point on my tips and filed down to the line. Here is a comparison photo that my brother kindly took:


Thursday, March 15, 2012
Pink and Black tips
I really can't find a more interesting title for this design. Well today I think I'll give you excuses to comment because I'm in need of a little help. Let's start off with what else I can call this design.
What was going on in my mind other than "that's pretty" was actually something slightly unrelated. You should all know by now that I'm a fan of Harry Potter, and have been since the beginning. I'm also a hopeless romantic. My favourite character in the series is Severus Snape, and I just love his connection to Lily Evans. Don't know what I'm talking about? Go and read the books, I don't want to spoil it. Anyway, The black in this design symbolizes Snape (he couldn't be any other colour) and the pink is Lily, and then I also hand painted a flower on a couple of nails, even though I don't think it's a lily.
 To be honest, I think, and this is rare, my right hand turned out better than my left. At least the blending was better. On that note, I accidentally discovered a new way to blend, which I'll show you when I post my St. Patrick's Day design on Saturday. Anyway, I really like this design and is one of my most commented on. Mostly because the flowers are NOT decals. You know I'm a free-hand artist and I don't like to cheat (unless I'm having a really lazy day!). Although it doesn't really show up on the flash photographs, on my nails the blend between the pink and black looks very purple, and as that's my favourite colour, I was really happy about that natural detail.
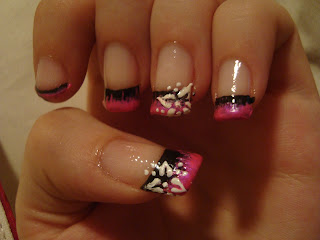 So make sure you start off with a thick base coat because you're dealing with black. Once it's dry, paint your tips black as neatly as you can. OR you can blend the black which now I think of it is a nice idea and I wish I had done that. I used Sally Hansen's "Black Out". Once it's dry, paint the very tip of your nails pink (I used MigiNailArt "Hot Pink") and blend it out either using a clear polish (which will contaminate it with colour), a brush, sponge, or any other way you can think of. I can't really teach you how to create the flower design, but you can try it out yourself (I used Nail Jazz "White") with an art brush or pen, get someone else to try, or you can use a decal. I placed the flowers on both ring and thumb nails. Or leave it blank. Feel free to cover this design with a glitter coat. Don't forget a regular top coat!


 Now for the help... please comment if you can! Or contact me somehow. I need to know if it's possible, and if so, how, to move this ENTIRE blog to a real website. I don't want to manually move a year's worth of posts or rewrite any of them. I googled "how to move blogspot blogs to website" and apparently there used to be a way a couple of years ago, but since then blogspot got clever and that option is no longer available. If you know how, PLEASE let me know! Thank you!
What was going on in my mind other than "that's pretty" was actually something slightly unrelated. You should all know by now that I'm a fan of Harry Potter, and have been since the beginning. I'm also a hopeless romantic. My favourite character in the series is Severus Snape, and I just love his connection to Lily Evans. Don't know what I'm talking about? Go and read the books, I don't want to spoil it. Anyway, The black in this design symbolizes Snape (he couldn't be any other colour) and the pink is Lily, and then I also hand painted a flower on a couple of nails, even though I don't think it's a lily.


Subscribe to:
Posts (Atom)