I really can't find a more interesting title for this design. Well today I think I'll give you excuses to comment because I'm in need of a little help. Let's start off with what else I can call this design.
What was going on in my mind other than "that's pretty" was actually something slightly unrelated. You should all know by now that I'm a fan of Harry Potter, and have been since the beginning. I'm also a hopeless romantic. My favourite character in the series is Severus Snape, and I just love his connection to Lily Evans. Don't know what I'm talking about? Go and read the books, I don't want to spoil it. Anyway, The black in this design symbolizes Snape (he couldn't be any other colour) and the pink is Lily, and then I also hand painted a flower on a couple of nails, even though I don't think it's a lily.

To be honest, I think, and this is rare, my right hand turned out better than my left. At least the blending was better. On that note, I accidentally discovered a new way to blend, which I'll show you when I post my St. Patrick's Day design on Saturday. Anyway, I really like this design and is one of my most commented on. Mostly because the flowers are NOT decals. You know I'm a free-hand artist and I don't like to cheat (unless I'm having a really lazy day!). Although it doesn't really show up on the flash photographs, on my nails the blend between the pink and black looks very purple, and as that's my favourite colour, I was really happy about that natural detail.
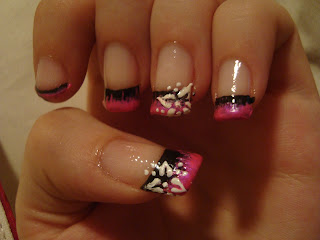
So make sure you start off with a thick base coat because you're dealing with black. Once it's dry, paint your tips black as neatly as you can. OR you can blend the black which now I think of it is a nice idea and I wish I had done that. I used Sally Hansen's "Black Out". Once it's dry, paint the very tip of your nails pink (I used MigiNailArt "Hot Pink") and blend it out either using a clear polish (which will contaminate it with colour), a brush, sponge, or any other way you can think of. I can't really teach you how to create the flower design, but you can try it out yourself (I used Nail Jazz "White") with an art brush or pen, get someone else to try, or you can use a decal. I placed the flowers on both ring and thumb nails. Or leave it blank. Feel free to cover this design with a glitter coat. Don't forget a regular top coat!


Now for the help... please comment if you can! Or contact me somehow. I need to know if it's possible, and if so, how, to move this ENTIRE blog to a real website. I don't want to manually move a year's worth of posts or rewrite any of them. I googled "how to move blogspot blogs to website" and apparently there used to be a way a couple of years ago, but since then blogspot got clever and that option is no longer available. If you know how, PLEASE let me know! Thank you!


No comments:
Post a Comment
Thank you for viewing my blog! I will read every comment and answer as many questions as I can, either with my own comment, or in the next blog post.