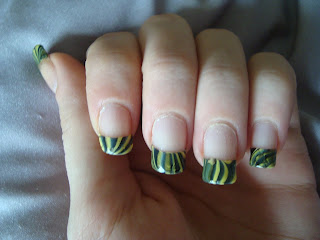
After many months of ignoring my (messy) water marbling cup, I decided to dust it off and try again. It turns out that lack of practice really shows. This was more of an experiment for myself and I happened to have my camera with me, so this isn't my best work, but I still like it.
I started out with an equal amount of black and yellow polish, and my design looked more like a wasp than a bee, so I painted my tips yellow and doubled the yellow drops that I placed in the water. That worked a lot better. When water marbling, it's always good to experiment before you start your design. I also learned that because I'm right handed, I should position my camera on my left side so my hand doesn't obscure the view. The more you know, 'cause knowledge it power! You should also use a cup of room temperature filtered water, but I used tap water. It still worked, but not as well as it could have. Filtered water works best. I'm also quite glad that this video wasn't for a contest because I really don't like speaking in my videos. I become shy and sound a lot younger than I really am, but hopefully I'll get over that one day. You can really see the waspishness of the picture below. I was tempted to draw antenas or wings, but I decided against that, but don't let me stop you! I also hit the bad luck that right after this design was complete, I caught my nails on the tape I was using and they smudged >.<
Place a french-tip guard just below your smile-line (the base of your tip) and cover the rest of your nail and around your finger with scotch tape leaving your tip exposed. The tape helps with your clean up later. Using a black and yellow polish (or any 2 or 3 colours if you don't want bee nails), carefully place drops in the water. For every black drop, add two yellow ones. Watch as it spreads in the water and creates a bulls-eye or target effect. Try to work very quickly to prevent the polish from drying before you're finished, and avoid using fast-drying polishes. I used Sally Hansen's Xtreme Wear "Black Out" and "Mellow Yellow". Once you feel you have enough polish in the water, take a tooth pick or a stick with pointy end and lightly manipulate the polish as though you were drawing. Try to create more lines than curves. Once you light your design, find an area that you'd like transfered onto your nail and carefully aim your tip at the water and dunk it in. To save on both time and polish, you can dip two or more nails in at once, but make sure they all hit the water at the same time! Once your nail is in the water, take your stick and clean the polish out of the water. Once it's clear, slowly take your finger out. Try to do this very slowly as to prevent air bubbles. Wait for your nail to dry, then remove the tape by cutting it away, then add a top coat. Water Marbling takes a LOT of practice!
Good luck!


No comments:
Post a Comment
Thank you for viewing my blog! I will read every comment and answer as many questions as I can, either with my own comment, or in the next blog post.